In-Depth
Windows 10 Anniversary Update: Linux Inside
Harness Bash and PowerShell for DevOps everywhere you work with the new Windows Subsystem for Linux.
- By Terrence Dorsey
- 09/30/2016
Graphical interfaces have come a long way over the years, but like many IT professionals today, I still spend a remarkable number of hours in either a terminal window or using keyboard productivity applications such as AutoHotKey. Indeed, command-line interfaces have been essential elements of the work environment throughout most of my career. For many years, they were the only practical interface. The first two computing books I read were Dan Gookin's "Enhanced Batch File Programming" and Arnold Robbins' evergreen "Unix in a Nutshell" reference (the copy on my bookshelf "updated for System V").
So when Microsoft revealed its plans to add support for the Linux Bash Shell in Windows 10 during Build 2016 in late March, I was quite intrigued. This was a huge breakthrough. On top of that, the latest news that Microsoft is open sourcing Windows PowerShell was icing on the cake. These milestones mean the most important tools available to developers and sysadmins are for the first time non-proprietary, community-supported and available on all significant computing platforms: Windows, Mac OS and Linux.
Why is it important having not one, but two terminal environments? First, Windows Subsystem for Linux (WSL, also known as Bash on Windows) brings a huge universe of easily installed languages, frameworks, software and tools to your familiar Windows environment. Along with that, you get decades of expertise, configuration tips, and code examples from the Unix/Linux and Mac OS world upon which to draw. Second, all of your PowerShell experience and tooling is now cross-platform.
Having two options for getting work accomplished that are available on pretty much any platform you're likely to find yourself working on -- Linux servers, Mac OS terminals, Raspberry Pi and now Windows 10 -- is a super power. You can't turn back time to avoid a server crash, but it's better than flying or X-ray vision.
Despite the numerous new features introduced in the Windows 10 Anniversary Update released about two months ago, the Linux Bash subsystem for IT pros is arguably the most significant and eagerly awaited addition to Microsoft's flagship PC OS, rivaled only by the security improvements (see "Dissecting Windows 10 Security" on p. 6). Since its release, I've spent a significant amount of time with WSL and will explain how it works, describe how to get the Bash environment set up on Windows with some basic examples, and introduce some of the DevOps-related tooling available via WSL. Along the way I'll also point out some related PowerShell tools.
Getting Started with WSL
It's important to understand that WSL is not a Linux VM, nor is it Wine in reverse and it's not an emulator. Rather, WSL is a layer of components that allows you to run native Linux ELF64 binaries without recompilation. Canonical Ltd., the company behind Ubuntu, worked directly with Microsoft on the implementation of WSL. Hence, WSL is effectively a fully functional Ubuntu environment running as an application that can directly interact with the NT kernel and Windows file system.
At this time, WSL is only available for Windows 10, and I don't see any indication that Microsoft plans to offer it for previous versions of Windows. Also be aware that, as I'm writing this, WSL is still a beta feature of Windows. It is being rolled out to all Windows 10 users in the Windows 10 Anniversary Update, though it is turned off by default.
If you don't have the Windows 10 Anniversary Update yet, look in Windows Update or Windows 10 Upgrade Assistant for "Feature update to Windows 10, version 1607." Another option, if you want to experiment on a test system or a non-Windows platform, is to download the Microsoft Edge browser on Win 10 Stable VM from the Microsoft Edge Development Free Virtual Machines page and upgrade the VM to version 1607 or later.
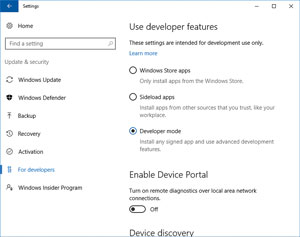
To enable WSL, go into the Settings app, click "For developers" and select Developer Mode (see Figure 1). Windows may install and enable some additional packages.
 [Click on image for larger view.]
Figure 1. Enable Developer Mode in Windows 10 Settings.
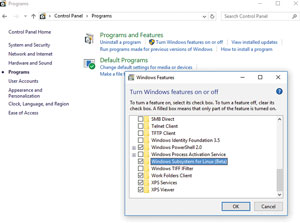
Now go to Control Panel | Programs and, under Programs and Features, click "Turn Windows Features on or off." In the dialog box that appears, scroll down the list to "Windows Subsystem for Linux (Beta)" and check the box to enable it (see Figure 2).
 [Click on image for larger view.]
Figure 2. Turn on the WSL feature in Windows.
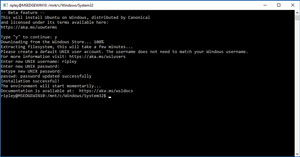
After these steps, the Start menu will contain a Bash on Ubuntu on Windows item that opens the WSL command line. The first time you start the WSL Bash prompt, there are a few remaining setup tasks including setting up a Unix username and password (see Figure 3). After this it drops you in the System32 folder -- just like ye olde CMD prompt -- and you're ready to go!
 [Click on image for larger view.]
Figure 3. First-time setup of your WSL Bash Prompt.
Working with Bash on Windows
OK, you have a Linux Bash prompt. Now what?
Fortunately, there's quite a bit of overlap between the MS-DOS commands and standard Unix commands for moving around the file system and manipulating files. I recommend the LinuxCommand.org tutorial as the best brief and to-the-point tutorial I've come across. "The Unix Programming Environment" (Prentice-Hall, 1983), by Unix inventors Brian Kernighan and Rob Pike, is the classic book on the subject and worth working through if you really want to understand what's going on.
Your Bash environment configuration settings are read from the hidden .bashrc and .profile files (and, optionally, .bash_profile). In Unix environments, files that start with a dot (.) character are notionally "hidden," though you can show them by using the "ls –a" command (list directory contents with the all flag). A good primer is available here.
A key feature of your new Ubuntu environment is built-in package management, a concept you'll be familiar with if you've used Chocolatey or NuGet to install and update software on Windows. With a brief command-line instruction, you can install any of thousands of common packages such as Ruby or Python, Apache or Nginx... the list goes on and on.
Ubuntu and Debian use apt-get as their default package management tool. As an example, it's usually a good idea to make sure you get the latest default packages -- sort of like running Windows Update on a fresh Windows installation. To do this in WSL, run the command:
sudo apt-get update
sudo is a command that temporarily gives you full access to the system, much like running a Windows program as Administrator. It means, basically, "super user do," and the system will prompt you for the password of a root or administrator user. Technically, it's not always necessary to sudo, but it's a good practice.
Apt-get update tells apt-get to look online for any new versions of installed packages. To install the packages run the command:
sudo apt-get upgrade
This will install updates for any applicable packages. You can also upgrade specific packages by running apt-get upgrade [packagename]. Check out the apt-get primer from Linux.com to learn more about package management.
There's so much you can do from here. I definitely recommend reading through Microsoft Principal Program Manager Pete Brown's excellent post on the Windows Developer Blog page, which provides examples that include working with files, remote scripting, setting up ssh keys for secure network communication, building software from sources, and installing and using Python. It's a great way to learn the ropes.
DevOps on the Command Line
Now let's get some real work accomplished from your terminal.
There are some built-in Server Manager Cmdlets in PowerShell that provide some remote management controls over Windows Server. For some hands-on information, see Rackspace Engineer Derek Lane's "Managing Windows Servers Remotely with PowerShell" article on the Rackspace Developer Blog, as well as Rackspace Developer Advocate Don Schneck's "Introducing PoshStack, the PowerShell Client for OpenStack", which gives you additional control over OpenStack-based cloud services.
Managing Unix/Linux-based services is best done through Bash on Windows now. Traditionally you'd log into a remote server using telnet or ssh, but these days, sysadmins use GNU Screen or tmux. These are multiplexing terminal emulators and window managers that are primarily used to set up configured, interactive terminal sessions, switch between them easily, detach from running sessions without shutting them down, and re-attach to those sessions later. As with Vim and Emacs, perpetual debate swirls around which is "better." In reality, they both work fine.
For Amazon Web Services (AWS), there are Windows and Bash installations of the AWS Command Line Interface (CLI) that provide an interactive "aws-shell" environment from which you can issue commands to manage S3 instances and transfer files, as well as managing EC2, SNS and SQS instances. The Windows installer just creates a Bash-like interface, so now that WSL is available, I would recommend installing that version from the start. Heads up that it requires installing Python and the pip package manager first, but that's easily handled:
sudo apt-get install python-pip
sudo pip install aws-shell
aws-shell
aws >
As an alternative, AWS Tools for Windows PowerShell provides a Windows-native command-line interface to all of the AWS resources and services available to the AWS SDK for the Microsoft .NET Framework. And now, thanks to Microsoft open sourcing PowerShell, you can take these tools and the scriptable PowerShell environment to Linux or Mac OS. For an overview of the translation between AWS cmdlets and API resources, be sure to check out "Mapping Cmdlets to AWS Service APIs" by Steve Roberts over on the AWS .NET Development blog.
Yet another option is SAWS: A Supercharged AWS Command Line Interface that brings the AWS CLI tools right into your familiar Windows command prompt using the same commands and syntax, but adding features including auto-completion of commands, options, bucket names, instance IDs and instance tags, customizable shortcuts, and syntax highlighting.
For Azure, the Microsoft Azure PowerShell package of cmdlets for developing, deploying and managing Azure applications through the command prompt has been around for a while.
Some interesting alternative projects, also being developed by the Microsoft Azure team, include Microsoft Azure Cross-Platform Command Line and Command-Line Tools for Azure. What's the difference? Unfortunately, the documentation is a bit scanty, but it looks like the Azure Cross-Platform Command Line is built on Node.js while the Command-Line Tools for Azure are built on Python. These Python-based CLI tools are still in preview, but seem designed with scripting in mind. Both toolsets can be installed directly via package managers (npm and pip, respectively) and both include built-in Docker container management features.
For configuration management and infrastructure deployment, Ansible, Chef, Docker, Puppet, Salt, Vagrant and similar toolsets all provide Bash terminal applications as their first-order interfaces. Likewise, on the output end, I've always found parsing logs and similar textual output far easier with Unix pipes, grep, sed, awk, or scripting languages like Python and Ruby. If you're only dealing with Windows Server, this may not be a big deal, but most sysadmins and DevOps teams I know are responsible for a growing diversity of storage and application services running in hardware, virtual machines, and cloud environments. You can watch the dashboard in a pretty browser window, but when things get weird, the Bash terminal becomes a really handy tool.
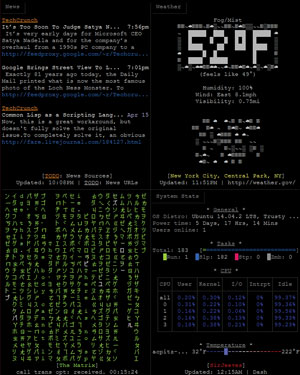
Speaking of dashboards, I'll leave you with this tidbit: dash, a Bash Dashboard that lets you show local weather, e-mail, system stats and other data streams in a configurable dashboard format (see Figure 4). Hey, who needs browsers when you've got Bash?
 [Click on image for larger view.]
Figure 4. Bash even does graphical dashboards.